برنامه نویسی اندروید

اموزش برنامه نویسی اندروید تخصصی

برنامه نویسی اندروید

اموزش برنامه نویسی اندروید تخصصی

راز موفقیت بسیاری از اپلیکیشن ها،توانایی آن ها در ارتباط و تعامل با منابع داده ای خارجی یا Remote است.با توجه به اهمیت این نکته،شمار متعددی API و سرویس های وب (Web Service) برای ساخت و توسعه اپلیکیشن ها در دسترس است که به طور تقریبی می توان در تمام ابعاد گوناگون،از پیش بینی وضع هوا گرفته تا کنترل تراکنش های بانکی هر شخص،از آن ها استفاده کرد.اندروید نیز به این منظور به تجهیزات قدرتمندی مجهز است،از جمله ساختار وب پایه ای که گوگل به خاطر آن مشهور است و مجموعه کارآمد از انواع ابزارهای کاربردی ومفید برای ارتباط با جهان خارج که در این قسمت آموزش به صورت کامل با نحوه کار و استفاده از آنها آشنا شده و خواهیم توانست اپلیکیشن های جذاب و کاربردی ایجاد کنیم.


عناوین کار با شبکه و ارتباطات در برنامه نویسی اندروید:


1.پاسخ به رویداد های WebVeiw


2.دسترسی به وب ویو با استفاده از جاوااسکریپت


3.دانلود و نمایش یک عکس از اینترنت


4.دانلود و نمایش بیش از یک عکس از اینترنت


5.دانلود و نمایش یک فایل متنی


6.سترسی به API های REST


7.ترجمه عبارت های JSON


8.ترجمه XML


9.انتقال داده از طریق NFC


10.برنامه نویسی سوکت


11.ساخت برنامه هواشناسی

  • vahid hasani

دانلود کتاب دتابیس دربرنامه نویسی اندروید


https://s20.picofile.com/file/8444331442/%D8%AF%DB%8C%D8%AA%D8%A7%D8%A8%DB%8C%D8%B3_%D8%A7%D9%86%D8%AF%D8%B1%D9%88%DB%8C%D8%AF.rar.html


برا دانلود سار کتابها به کانال ما در تلگرام سر بزنید


telegram.me\ketabkadepdf

  • vahid hasani

نوتیفیکیشن شیوه ای جدید برای برقراری ارتباط میان توسعه دهندگان برنامه های موبایلی ( اپلیکیشن ها ) و کاربران شان است . از ابزارهای قوی برای جلب توجه کاربران اپلیکیشن‌های موبایل، ارسال پوش نوتیفیکیشن (Push Notification) به آنها است. منظور از پوش نوتیفیکیشن محتوایی متنی , تصویری یا صوت و ویدئو است که به سمت گوشی نصب کننده اپلیکیشن فرستاده می‌شود و مخاطب یا همان نصب کننده اپلیکیشن از پیام ارسالی شما مطابق با تنظیماتی که در گوشی موبایل خود برای نمایش نوتیفیکیشن یا زنگ هشدار قرارداده است باخبر میشود.

  • vahid hasani

اشکالات سیستم جرقه که در کار موتور موثر می باشند:


1.کمبود قدرت:


اولین علت:نامیزان بودن زمان جرقه و تایمینگ ها


دومین علت:شل و سولفاته شدن اتصال ها و دهانه پلاتین


2.دیر روشن شدن موتور:


اولین علت:کثیف بودن شمع ها


دومین علت:خراب بودن وایرها


سومین علت:نامیزان بودن دهانه پلاتین

  • vahid hasani

در این اموزش با نحوه ایجاد یک سبک نمایشی برای یک دکمه اشنا می شیم.برای این کار یک پروژه جدید ایجاد می کنیم و اسمش رو Styles قرار میدیم


بعد از ایجاد پروژه یک دکمه بروی لایه خودمون اضافه می کنیم  تا با استفاده از استایل یک طرح زیبا بهش بدیم،برای ایجاد یک استایل جدید وارد پوشه res-values میشیم و فایل styles.xml رو باز می کنیم و کدهای زیر رو بهش اضافه میکینم.


  <!-- اماده سازی ستایل برای طراحی دکمه. -->

<style name="CustomButtonStyle">

<item name="android:layout_width">120dp</item>

<item name="android:layout_height">50dp</item>

<item name="android:capitalize">characters</item>

<item name="android:typeface">serif</item>

<item name="android:shadowDx">1.2</item>

<item name="android:shadowDy">1.2</item>

<item name="android:shadowRadius">2</item>

<item name="android:textColor">#494948</item>/>

<item name="android:gravity" >center</item>

<item name="android:layout_margin" >3dp</item>

<item name="android:textSize" >18sp</item>

<item name="android:shadowColor" >#000000</item>

</style>


</resources>


یک تگ style ایجاد میکنیم و اسمش رو CustomButtonStyle قرار میدیم،در مرحله دوم یک مقدار layout_width و layout_height میدیم تا عرض و ارتفاع دکمه رو هم از طریق استایل تغییر بدیم.در مرحله سوم یک خاصیت capitalize میدیم تا تکست داخل باتن به صورت درشت نوشته شوند.در مرحله چهارم خاصیت typeface رو بهش اضافه میکنیم تا تکست داخل باتن طرح serif رو بگیره،در مرحله پنجم shadowDx وshadowDy میدیم تا به تکستمون سایه بدیم.در مرحله ششم یک خاصیت shadowRadius اضافه میکنیم تا برای سایمون یک شعاع در نظر بگیره،در مرحله هفتم خاصیت textColor اضافه میکنیم تا به تکستمون رنگ در نظر بگیره،در مرحله هشتم خاصیت gravity میدیم تا تکستمون در مرکزیت باتن قرار بدیم،در مرحله نهم خاصیت layout_margin اضافه میکنیم تا به دکمون مقدار margin بده،در مرحله دهم خاصبت textSize رو اضافه میکنیم تا اندازه تکست رو تغییر بده،در مرحله اخر هم خاصیت shadowColor رو هم اضافه میکنیم تا یک رنگ به سایه بده.


بعد از تکمیل کردن style حالا وقت اون رسیده که استایلمون رو به دکمه اضافه کنیم،برای این کار از این دستور استفاده می کنیم style="@style/CustomButtonStyle

  • vahid hasani


ساخت لینک به یک آدرس اینترنتی (نمایش لیست مرورگرهای اینترنت گوشی، بعد از اشاره به لینک)، در برنامه نویسی اندروید


فرض کنید که بخواهیم به یک آدرس اینترنتی (مثلا سایت گوگل به آدرس اینترنتی http://www.google.com)، یک لینک بدهیم، برای این منظور باید از کدهای زیر استفاده کنیم :


Intent browserIntent = new Intent(Intent.ACTION_VIEW, Uri.parse("http://www.google.com"));

startActivity(browserIntent);


اگر بخواهیم لینک، توسط یک دکمه (Button) ساخته شود، می توانیم آن کدها را به صورت زیر برای دکمه (Button) به کار ببریم (فرض کرده ایم که id دکمه برابر button1 می باشد) :


Button b = (Button) findViewById(R.id.button1);

b.setOnClickListener(new OnClickListener() {


    @Override

    public void onClick(View v) {

        Intent browserIntent = new Intent(Intent.ACTION_VIEW, Uri.parse("http://www.google.com"));

        startActivity(browserIntent);

    }

});


پس از اشاره بر روی دکمه (Button)، لیستی از مرورگرهای اینترنت گوشی نمایش داده می شود که کاربر می تواند مرورگر اینترنت دلخواه خود را انتخاب کند تا آن آدرس اینترنتی، در مرورگر باز شود.

  • vahid hasani


کار با حالت دوبل بک(Double back)


در بسیاری از برنامه ها دیدم که درهنگام زدن دکمه بک گوشی تلفن همراه  یک پیغامی با  متن (برای خروج دوباره دکمه بک را  فشار دهید) رو به رو شدیم.در این مبحث میخواهیم این حالت رو به برنامه خودمون بیاریم.


برای شروع کار یک پروژه جدید ایجاد می کنیم و اسمش رو DoubleBack قرار میدیم.در ادامه وارد کلاس MainActivity.java می شویم و کدهای جاوای برنامه رو  داخلش می نویسیم.(نیازی به وارد کردن عنصری به لایه برنامه  نیست).در داخل کدهای جاوای برنامه ابتدا یک زمان برای دومین پرس دکمه بک در نظر میگیریم که در اینجا  2 ثانیه است.سپس یک متد onBackPressed ایجاد میکنم تا با دکمه بک کار کنیم. (کدهای کامل کلاس MainActivity).


 import android.os.Bundle;

import android.app.Activity;

import android.view.Menu;

import android.widget.Toast;


public class MainActivity extends Activity {


private static final int TIME_INTERVAL = 2000; // # milliseconds, زمان مورد نیاز  برای دو پرس دکمه بازگشت.

private long mBackPressed;


@Override

protected void onCreate(Bundle savedInstanceState) {

super.onCreate(savedInstanceState);

setContentView(R.layout.activity_main);

}


//متد دکمه بازگشت

@Override

public void onBackPressed()

{

if (mBackPressed + TIME_INTERVAL > System.currentTimeMillis())

{

super.onBackPressed();

return;

}

//نمایش پیغام هنگام پرس دکمه بازگشت

else { Toast.makeText(getBaseContext(), "برای خروج از برنامه بروی دکمه خروج  دوباره کنید!", Toast.LENGTH_SHORT).show(); }


mBackPressed = System.currentTimeMillis();

}

  • vahid hasani

تعیین فونت (font) دلخواه برای متن نمایش داده شده در یک TextView


چنانچه بخواهیم که یک فونت (font) دلخواه را برای متن نمایش داده شده در یک TextView انتخاب کنیم، باید ابتدا فایل با پسوند ttf مربوط به آن فونت را در پوشه assets از پروژه اندروید، کپی کنیم. مثلا فرض کنید که من یک فایل مربوط به فونت دست نویس (فونتی که به شکل دست نویس می باشد)، با نام Dast_Nevis.ttf دارم و می خواهم از آن، برای نمایش متن در یک TextView استفاده کنم. ابتدا یک پوشه (folder) با نام fonts در پوشه assets از پروژه اندروید می سازم و فایل Dast_Nevis.ttf را در آن کپی می کنم :


حال با فرض اینکه TextView را با id برابر textView1 تعریف کرده باشیم، در میان کدهای Activity ، کدهای زیر را می نویسیم :


TextView tv = (TextView) findViewById(R.id.textView1);

Typeface tf = Typeface.createFromAsset(getAssets(),"fonts/Dast_Nevis.ttf");

tv.setTypeface(tf);


اکنون می توانید متن دلخواهی را برای نمایش در TextView تعیین کنید، مثلا برای این فونتی که من انتخاب کردم، حتما باید یک متن فارسی را در TextView نمایش بدهم تا فونت مورد نظر، به کار رود. به عنوان مثال، یک نمونه از نتیجه، به صورت زیر می باشد :


در ضمن، اگر این فونت را دوست داشته اید، من فایل های مربوط به آن را برایتان در زیر می گذارم تا دانلود کنید (دقت کنید که علاوه بر فایل با پسوند ttf ، دو فایل دیگر با پسوندهای دیگر را هم گذاشته ام که برای مواردی است که می خواهید در طراحی وب استفاده کنید، نه در برنامه نویسی اندروید، زیرا در طراحی وب، معمولا نیاز به سه نوع فایل مورد نظر است) :

  • vahid hasani

Java Arrays

vahid hasani | | ۰ نظر

Normally, an array is a collection of similar type of elements which has contiguous memory location.

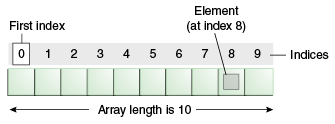
Java array is an object which contains elements of a similar data type. Additionally, The elements of an array are stored in a contiguous memory location. It is a data structure where we store similar elements. We can store only a fixed set of elements in a Java array.

Array in Java is index-based, the first element of the array is stored at the 0th index, 2nd element is stored on 1st index and so on.

Unlike C/C++, we can get the length of the array using the length member. In C/C++, we need to use the sizeof operator.


In Java, array is an object of a dynamically generated class. Java array inherits the Object class, and implements the Serializable as well as Cloneable interfaces. We can store primitive values or objects in an array in Java. Like C/C++, we can also create single dimentional or multidimentional arrays in Java.

Moreover, Java provides the feature of anonymous arrays which is not available in C/C++.

Java array

Advantages

  • Code Optimization: It makes the code optimized, we can retrieve or sort the data efficiently.
  • Random access: We can get any data located at an index position.

Disadvantages

  • Size Limit: We can store only the fixed size of elements in the array. It doesn't grow its size at runtime. To solve this problem, collection framework is used in Java which grows automatically.
  • vahid hasani

This example demonstrates how How to create shadow in Android Buttons.

Step 1  − Create a new project in Android Studio, go to File ⇒ New Project and fill all required details to create a new project.

Step 2  − Add the following code to res/layout/activity_main.xml.
<?xml version="1.0" encoding="utf-8"?>
<androidx.constraintlayout.widget.ConstraintLayout
   xmlns:android="http://schemas.android.com/apk/res/android"
   xmlns:app="http://schemas.android.com/apk/res-auto"
   xmlns:tools="http://schemas.android.com/tools"
   android:layout_width="match_parent"
   android:layout_height="match_parent"
   tools:context=".MainActivity">
   <TextView
      android:layout_width="wrap_content"
      android:layout_height="wrap_content"
      android:text="Hello World!"
      app:layout_constraintBottom_toBottomOf="parent"
      app:layout_constraintLeft_toLeftOf="parent"
      app:layout_constraintRight_toRightOf="parent"
      app:layout_constraintTop_toTopOf="parent" />
   <Button
      android:layout_width="wrap_content"
      android:layout_height="wrap_content"
      android:layout_marginTop="20dp"
      android:width="200dp"
      android:layout_gravity="center"
      android:text="Shadow Button"
      android:background="@drawable/shadow_button_layer_list"/>
</androidx.constraintlayout.widget.ConstraintLayout>

Step 3  − Add the following code to src/MainActivity.java
package com.medkart.sample;
import androidx.appcompat.app.AppCompatActivity;
import android.os.Bundle;
public class MainActivity extends AppCompatActivity {
   @Override
   protected void onCreate(Bundle savedInstanceState) {
      super.onCreate(savedInstanceState);
      setContentView(R.layout.activity_main);
   }
}

Step 4  − Add the following code to res/drawable/shadow_button_layer_list.xml
<?xml version="1.0" encoding="utf-8"?>
<layer-list xmlns:android="http://schemas.android.com/apk/res/android">
   <!-- Gray shadow. -->
   <item android:left="3dp" android:top="5dp">
      <shape>
         <solid android:color="@android:color/darker_gray" />
         <corners android:radius="15dp" />
      </shape>
   </item>
   <!-- White foreground. -->
   <item android:bottom="5dp" android:right="3dp">
      <shape>
         <solid android:color="@android:color/white" />
         <corners android:radius="15dp" />
      </shape>
   </item>
</layer-list>

Step 5  − Add the following code to Manifests/AndroidManifest.xml
<?xml version="1.0" encoding="utf-8"?>
<manifest xmlns:android="http://schemas.android.com/apk/res/android"
   package="com.medkart.sample">
   <application
      android:allowBackup="true"
      android:icon="@mipmap/ic_launcher"
      android:label="@string/app_name"
      android:roundIcon="@mipmap/ic_launcher_round"
      android:supportsRtl="true"
      android:theme="@style/AppTheme">
      <activity android:name=".MainActivity">
         <intent-filter>
            <action android:name="android.intent.action.MAIN" />
            <category android:name="android.intent.category.LAUNCHER" />
         </intent-filter>
      </activity>
   </application>
</manifest>

Let's try to run your application. I assume you have connected your actual Android Mobile device with your computer. To run the app from android studio, open one of your project's activity files and Click Run
 Icon from the toolbar. Select your mobile device as an option and then check your mobile device which will display your default screen –


  • vahid hasani